The JWT authentication feature in the App Builder plugin for WordPress provides a secure and efficient way to manage user authentication. When a user logs into the app, the login request is sent to the server, where the App Builder plugin generates a JWT token. This token is then used to authenticate and authorize user interactions with the app.
Key Features:
- Secure Token Generation: Upon successful login, the App Builder plugin generates a JWT token on the server. This token is securely signed and can be encrypted, ensuring the integrity and confidentiality of user data.
- Efficient Authentication: The token is used to validate user requests and manage sessions, allowing for a stateless, scalable authentication process that minimizes server-side storage needs.
- Seamless Integration: The plugin integrates with WordPress to leverage JWT authentication, providing a smooth and secure login experience across the app.
- Token Management: JWT tokens come with expiration times, enhancing security by periodically renewing tokens and managing session lifecycles effectively.
By implementing JWT authentication, the App Builder plugin ensures that user logins are securely handled and that session management is both scalable and efficient.
Configuring JWT Authentication
To set up JWT authentication in the App Builder plugin for WordPress, follow these steps to enable the feature and configure the secret key and token expiration time:
1. Access JWT Authentication Settings
- Navigate to App Builder Settings:
- Log in to your WordPress admin dashboard.
- Go to the App Builder plugin from sidebar.
- Select the Features Tab:
- Click on the Features tab within the App Builder settings panel.
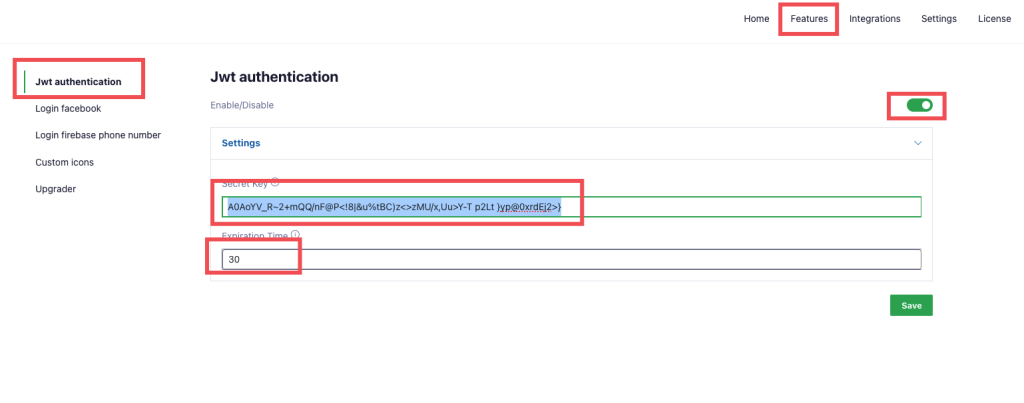
2. Enable JWT Authentication
- Toggle the Switch:
- In the Features tab, locate the JWT Authentication section.
- Use the switch button to enable or disable JWT authentication as needed.
3. Configure the Secret Key
- Enter the Secret Key:
- In the JWT Authentication panel, find the Secret Key input field.
- Enter a strong, unique secret key that will be used to sign the JWT tokens.
4. Set Token Expiration Time
- Enter Expiration Time:
- Locate the Expiration Time input field in the same panel.
- Enter the desired expiration time for JWT tokens. You can specify the time in minutes (e.g., 30 for 30 days) or use a decimal value to represent partial days (e.g.,
0.5for half a day).
- Save Changes:
- Click the Save button to apply your settings.
FAQs?
To enable the HTTP Authorization header in Apache when using CGI/FastCGI, follow these steps:Log in to WHM:
Open your web browser and navigate to your WHM login page.
Enter your username and password to log in.
Access Apache Configuration:
In the WHM search bar, type Apache Configuration.
Click on Include Editor under the Service Configuration section.
Edit Pre Main Include:
In the Include Editor, select Pre Main Include from the dropdown menu.
Choose the appropriate Apache version (e.g., All Versions).
Add Configuration to Pass Authorization Header:
Add the following configuration to ensure that the Authorization header is passed to the CGI/FastCGI environment:<IfModule mod_rewrite.c> RewriteEngine On RewriteCond %{HTTP:Authorization} ^(.*) RewriteRule ^(.*) - [E=HTTP_AUTHORIZATION:%1] </IfModule> SetEnvIf Authorization "(.*)" HTTP_AUTHORIZATION=$1
Save and Restart Apache:
Click the Update button to save the changes.
WHM will prompt you to restart Apache to apply the changes. Confirm to restart the Apache service.